

How To Set Up A Microphone On Windows 7

Whether you lot're dictating with speech recognition or talking to a family member or gaming buddy over voice chat, speaking can be faster and clearer than typing. Luckily, setting up a microphone on Windows is simple and easy to do. Hither's how to set and test your Microphone on Windows 10.
Setting Up a Microphone
One of the first things you'll need to do earlier setting up your microphone is to plug information technology in–or connect it via Bluetooth– and install any drivers. Near of the time Windows will automatically search for and install the necessary drivers, only if that doesn't work, then you might need to check the manufacturer'southward website for specific drivers.
RELATED: The Best USB Microphones
Afterwards you've installed all the necessary drivers, right-click the volume icon in your arrangement tray and then click the "Sounds" command.

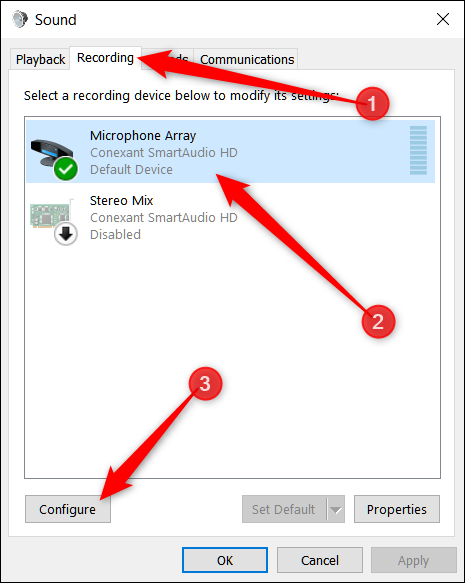
In the Sound window, switch to the "Recording" tab to see microphone settings. Select the microphone you want to apply and then click the "Configure" push.
In the Spoken communication Recognition window that opens, click the "Gear up Microphone" link. And while this tool is geared toward oral communication recognition, setting upwardly your microphone here can as well help configure it better for vocalism chats.

Once the setup wizard opens, choose the type of microphone you have and and then click "Next."

The next screen provides tips for using your microphone that match upward with the microphone type you lot chose on the previous screen.

Next, the wizard provides you with some text to read aloud. Co ahead and practice that and then click "Side by side."

That'southward it, your microphone is now set to apply. Click "Terminate" to close the wizard.

If your computer didn't hear you, your microphone was muted, or you have more than one microphone installed that might be picking upward your voice, you'll see this message on the adjacent screen. You may need to repeat the previous screen to ready up your microphone.

RELATED: How to Get Started With Spoken language Recognition on Windows vii or 8
Testing Your Microphone
Whether you configure your microphone using the sorcerer, we described in the previous section or at present, you tin can perform a quick examination anytime to brand sure your microphone is hearing you.
Open up the Sounds window by correct-clicking the sound icon in the taskbar and clicking the "Sounds" command.
Next, switch to the "Recording" tab to see a list of available devices.

Now, speak into your microphone and look for the dark-green bars to motion as yous do. If the bars are rising with your voice, your device is working properly.

If you can see the green bar moving, merely it's barely going upwardly at all, you might try to plough up the levels for your microphone. This works by increasing the sensitivity of the microphone, then it's able to pick upward more sounds. From the "Recording" tab, click the microphone, then on "Properties."

Switch to the "Levels" tab and then arrange your microphone's sensitivity so it tin can selection up your voice more easily.

If y'all're still unable to see the confined rising, you may need to reinstall or update your drivers.
RELATED: The Just Condom Style to Update Your Hardware Drivers on Windows
Source: https://www.howtogeek.com/370220/how-to-set-up-and-test-microphones-in-windows-10/
Posted by: waltersextralas.blogspot.com
0 Response to "How To Set Up A Microphone On Windows 7"
Post a Comment